VNC経由でCマウントレンズのフォーカスをあわせるのは、タイムラグの関係で至難の業かも。スマホ経由で接続することを想定すると、画面の大きさもあいまって、やっぱり難しいと思う。あるいは液晶ディスプレイをつけるか?
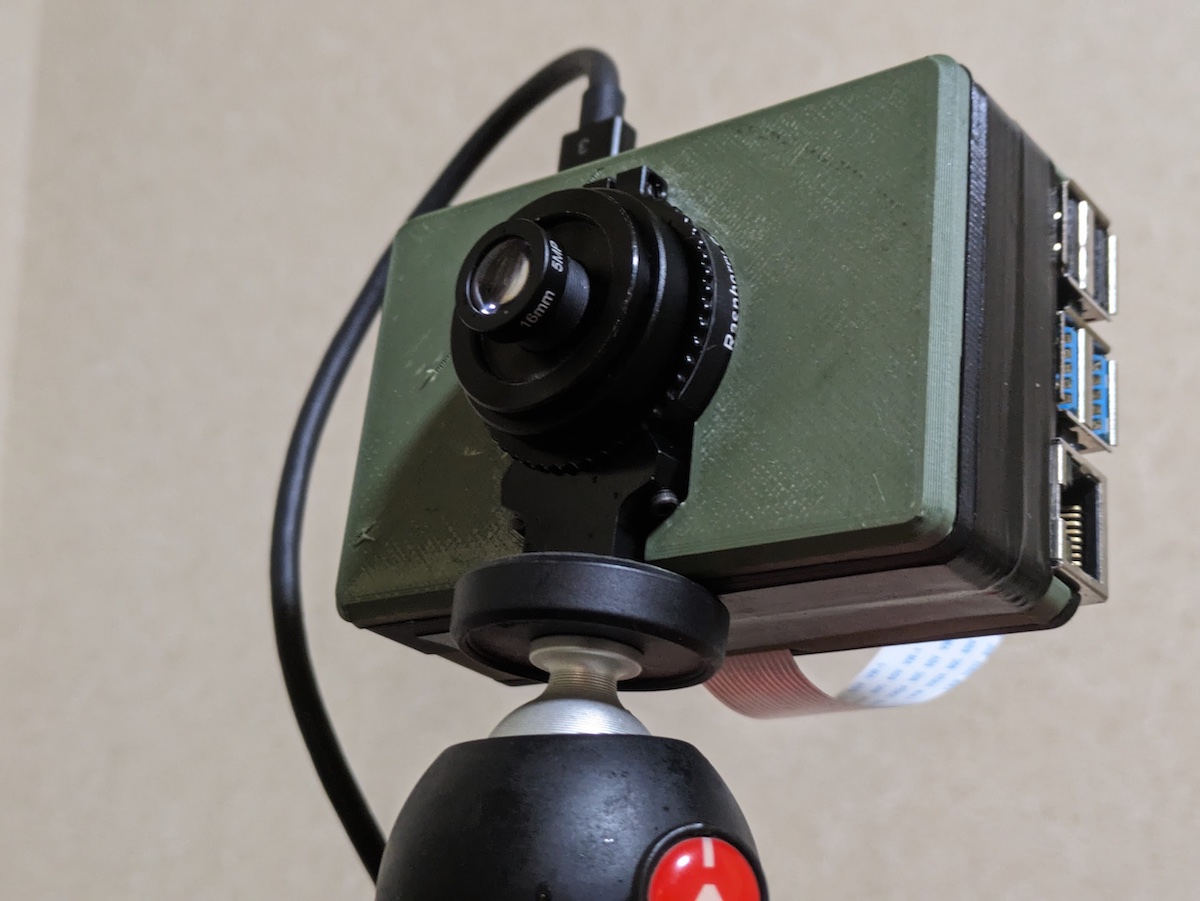
フォーカスはドラレコみたいに無限遠で固定したほうがいいかも。ということでM12の16mmレンズをおもちゃ箱からひっぱりだしてきた(20~25mmがほしい)。Cマウントアダプターを噛ませて装着した姿がこちら。いずれグルーガンか何かで固定したい。アストロイドも焦点固定のように見えるけれど、そういうことかしら?
撮影はターミナルで。 libcamera-still コマンドを使う。libcamera-jpgとの違いがよくわからないけれど、たぶん使えるパラメータが多いので、libcamera-stillでいいんじゃないだろうか。
シャッタースピードは速いほうがよいと思う(Solveに時間がかかるしね)。シャッタースピードのプションは–shutter。シャッタースピードはマイクロ秒。1にゼロが3個で1秒。数えるのしんどい。
夜空を撮るにあたってgainは大事だよね。下限は0として上限は不明。GAINの値を100以上にすると写りに変化がない印象。1~100で適正値をさぐるべし。
そんなこったで実際の夜空を撮ってみる必要はあるけれど、雨空を撮ってみた感じ、星撮りの設定はこのあたりかなぁ。ちょっと明るい気がする。
libcamera-still -o ~/skysolve/test.jpg –shutter 10000000 –gain 5
libcamera-still のオプションは次のとおり。目がチカチカするね。以上。
-h [ –help ] [=arg(=1)] (=0) Print this help message
–version [=arg(=1)] (=0) Displays the build version number
–list-cameras [=arg(=1)] (=0) Lists the available cameras attached to the system.
–camera arg (=0) Chooses the camera to use. To list the available indexes, use the
–list-cameras option.
-v [ –verbose ] [=arg(=2)] (=1) Set verbosity level. Level 0 is no output, 1 is default, 2 is verbose.
-c [ –config ] [=arg(=config.txt)] Read the options from a file. If no filename is specified, default to
config.txt. In case of duplicate options, the ones provided on the command line
will be used. Note that the config file must only contain the long form
options.
–info-text arg (=#%frame (%fps fps) exp %exp ag %ag dg %dg)
Sets the information string on the titlebar. Available values:
%frame (frame number)
%fps (framerate)
%exp (shutter speed)
%ag (analogue gain)
%dg (digital gain)
%rg (red colour gain)
%bg (blue colour gain)
%focus (focus FoM value)
%aelock (AE locked status)
%lp (lens position, if known)
%afstate (AF state, if supported)
–width arg (=0) Set the output image width (0 = use default value)
–height arg (=0) Set the output image height (0 = use default value)
-t [ –timeout ] arg (=5000) Time (in ms) for which program runs
-o [ –output ] arg Set the output file name
–post-process-file arg Set the file name for configuring the post-processing
–rawfull [=arg(=1)] (=0) Force use of full resolution raw frames
-n [ –nopreview ] [=arg(=1)] (=0) Do not show a preview window
-p [ –preview ] arg (=0,0,0,0) Set the preview window dimensions, given as x,y,width,height e.g. 0,0,640,480
-f [ –fullscreen ] [=arg(=1)] (=0) Use a fullscreen preview window
–qt-preview [=arg(=1)] (=0) Use Qt-based preview window (WARNING: causes heavy CPU load, fullscreen not
supported)
–hflip [=arg(=1)] (=0) Request a horizontal flip transform
–vflip [=arg(=1)] (=0) Request a vertical flip transform
–rotation arg (=0) Request an image rotation, 0 or 180
–roi arg (=0,0,0,0) Set region of interest (digital zoom) e.g. 0.25,0.25,0.5,0.5
–shutter arg (=0) Set a fixed shutter speed in microseconds
–analoggain arg (=0) Set a fixed gain value (synonym for ‘gain’ option)
–gain arg Set a fixed gain value
–metering arg (=centre) Set the metering mode (centre, spot, average, custom)
–exposure arg (=normal) Set the exposure mode (normal, sport)
–ev arg (=0) Set the EV exposure compensation, where 0 = no change
–awb arg (=auto) Set the AWB mode (auto, incandescent, tungsten, fluorescent, indoor, daylight,
cloudy, custom)
–awbgains arg (=0,0) Set explict red and blue gains (disable the automatic AWB algorithm)
–flush [=arg(=1)] (=0) Flush output data as soon as possible
–wrap arg (=0) When writing multiple output files, reset the counter when it reaches this
number
–brightness arg (=0) Adjust the brightness of the output images, in the range -1.0 to 1.0
–contrast arg (=1) Adjust the contrast of the output image, where 1.0 = normal contrast
–saturation arg (=1) Adjust the colour saturation of the output, where 1.0 = normal and 0.0 =
greyscale
–sharpness arg (=1) Adjust the sharpness of the output image, where 1.0 = normal sharpening
–framerate arg (=-1) Set the fixed framerate for preview and video modes
–denoise arg (=auto) Sets the Denoise operating mode: auto, off, cdn_off, cdn_fast, cdn_hq
–viewfinder-width arg (=0) Width of viewfinder frames from the camera (distinct from the preview window
size
–viewfinder-height arg (=0) Height of viewfinder frames from the camera (distinct from the preview window
size)
–tuning-file arg (=-) Name of camera tuning file to use, omit this option for libcamera default
behaviour
–lores-width arg (=0) Width of low resolution frames (use 0 to omit low resolution stream
–lores-height arg (=0) Height of low resolution frames (use 0 to omit low resolution stream
–mode arg Camera mode as W:H:bit-depth:packing, where packing is P (packed) or U
(unpacked)
–viewfinder-mode arg Camera mode for preview as W:H:bit-depth:packing, where packing is P (packed)
or U (unpacked)
–buffer-count arg (=0) Number of in-flight requests (and buffers) configured for video, raw, and
still.
–viewfinder-buffer-count arg (=0) Number of in-flight requests (and buffers) configured for preview window.
–autofocus-mode arg (=default) Control to set the mode of the AF (autofocus) algorithm.(manual, auto,
continuous)
–autofocus-range arg (=normal) Set the range of focus distances that is scanned.(normal, macro, full)
–autofocus-speed arg (=normal) Control that determines whether the AF algorithm is to move the lens as quickly
as possible or more steadily.(normal, fast)
–autofocus-window arg (=0,0,0,0) Sets AfMetering to AfMeteringWindows an set region used, e.g.
0.25,0.25,0.5,0.5
–lens-position arg Set the lens to a particular focus position, expressed as a reciprocal distance
(0 moves the lens to infinity), or “default” for the hyperfocal distance
–hdr [=arg(=1)] (=0) Enable (1) or disable (0) High Dynamic Range, where supported
–metadata arg Save captured image metadata to a file or “-” for stdout
–metadata-format arg (=json) Format to save the metadata in, either txt or json (requires –metadata)
-q [ –quality ] arg (=93) Set the JPEG quality parameter
-x [ –exif ] arg Add these extra EXIF tags to the output file
–timelapse arg (=0) Time interval (in ms) between timelapse captures
–framestart arg (=0) Initial frame counter value for timelapse captures
–datetime [=arg(=1)] (=0) Use date format for output file names
–timestamp [=arg(=1)] (=0) Use system timestamps for output file names
–restart arg (=0) Set JPEG restart interval
-k [ –keypress ] [=arg(=1)] (=0) Perform capture when ENTER pressed
-s [ –signal ] [=arg(=1)] (=0) Perform capture when signal received
–thumb arg (=320:240:70) Set thumbnail parameters as width:height:quality, or none
-e [ –encoding ] arg (=jpg) Set the desired output encoding, either jpg, png, rgb, bmp or yuv420
-r [ –raw ] [=arg(=1)] (=0) Also save raw file in DNG format
–latest arg Create a symbolic link with this name to most recent saved file
–immediate [=arg(=1)] (=0) Perform first capture immediately, with no preview phase
–autofocus-on-capture [=arg(=1)] (=0)
Switch to AfModeAuto and trigger a scan just before capturing a still
この記事へのコメント
是非、液晶画面を付けてASTROID2にしましょう!
って公式からASTROID2のページが消えて何ヶ月も経ってしまった・・・
ヤフオクのASTROIDを落とさないよう我慢してるのになぁ
液晶、まさにいまも迷い中なんですが、やっぱりそれがいいですかね。
液晶をつけると、抹茶カステラを二切れ並べたみたいに太ってしまってうのですよ。
暗いところでは眩しいでしょうし。
しかし、あぁ、素直につけたほうがいいかなぁ。
別に組むかなぁ。うううううう。
抹茶とティラミスの二段重ね・・・的な?
液晶付きのラズパイとか無いですかね
レンズを小さくしたり、基板との位置関係を・・・
ってもうそれ新規機体!?
グフ行ってみよぉ~
新機体! グフ! コンセプトが変われば機体も変わりますよね。いずれグフやりましょう!
自分もHQ Cameraで星の写真を撮ったことありますが(天文ガイドに載りました。ビギナーの部ですがf^^)HQ CameraのIMX477ってあんまり感度高くないんですよね。
IR Cutフィルタを外していないなら、それを外して少しでも光量を稼ぐのがいいかもです。色は真っ赤になりますが。両面テープで貼ってあるので、戻そうと思えば戻せます。
とてもHQ Cameraで撮影した写真とは思えない出来栄えすね!
なるほど確かに光量をかせぐためにフィルタをはずすという手はありですね。ちょっと見てみたら、CマウントやらM12のレンズ側にフィルタがついていることもあるみたいなので、そっちも取らないとですね。
>タイムラグの関係で至難の業
わかるよ~。
見ている状況と実際の状況がズレていて難儀したという経験はある。ただ、具体的にどんな時だった思い出せない。
パッと思いつく状況は、ディレーの多いキャプチャーボードを通したモニターでシューティング系ゲームをやるとそうなるよね。
避けようと思ったときには、既に当たってやられているという・・・
おまえは既に死んでいる。^^的なぁ
あと、シャッタースピードの少数や整数は、天体撮影ではたぶんあまり困らないものの、通常撮影は分数が基本になってるから戸惑うんだよね。
1/250秒って何秒?ってなるよ。
正解は0.004秒。^^ –shutter 4000だな
リモートでつないだら5秒くらいタイムラグが出ることがあるのですよ。改善する方法もあるのかもしれませんが。
たしかに1/250秒って、何秒ってなりますよね。もう分数に慣れてるから、–shutter 4000って見ると、あ、1/4000ねって思ってしまいます。かえって0.004秒だと分かりにくいですし。あ、混乱してきた。
要は慣れってことでしょうかね。
画素数が多いのでタイムラグの一番の原因はSDカードですよ。(INDIと一緒ですね)
M.2 SSDの追加がおすすめです。(ラズパイで2.5インチだと電力が心配)
こちらはどうもVNCのタイムラグみたいです。ディスプレイ直結ならほぼタイムラグなしでした。M.2は手元にありますが、今回は筐体を小さく抑えたいのでSDカードでやる方向です^^
プレビューはJPEGに
この2点だけでかなり速くなります。
今回は、トイカメラっぽく、プレビューなしです。いまのところ、撮影サイズ1024*768で露出5秒、解析からLINEへの送信まで10秒くらいなので、実用になっている感じです。いまのところは…。そうそう、デフォルトJPGで、INDIは使ってないです。
SDカードで圧縮無しだと画像小さくても遅くなりますよ。
スマホと比較して処理速度1/3,ディスクは10倍くらい遅いのでどうしても保存という工程が挟まると遅くなっちゃうんですよ。
一時的な保存ならRAMディスク作ってそこに保存すると回避できますよ。
libcamera-hello というプレビュー用のコマンドあるみたいです。
JPEGだとフル解像度ですが圧縮するので書き込みが軽くなります。
(その辺の対策の仕方がINDIをラズパイで使用するのと同様ということですね。非力なマシン対策です。)
電源オフで消えるのでシャットダウン前にディスクに保存するようにスクリプト組みます。
追記
リモートデスクトップ系って写真どんなサイズでもディスプレイサイズの画像の転送(場合によっては圧縮かけて)だけなので通信でのプレビューだと最軽量(さすがにローカルディスプレイには敵いませんが)なので、そこまで遅延があるとなるとなにか原因あると思いますよ。(小さなサイズであれば動画もなんとかリアルタイムで見えるくらいの速度あります。)
ありがとうございます。このあたりの話ですかね。
https://note.com/marupeke296/n/nfe2b6ebd847c
いまのところVNCでの運用はあまり考えていないのですが、知識として知っておいたほうがよさそうですね。
あ、こんな現象が起きるんですね。
やってる設定見るとラズパイだとraspi-configである程度出来た記憶があります。(そういえばAstRPi作ったときにリモートデスクトップ用にあれこれ設定してました)
システム、アプリ、画像ファイルを全てメモリで扱うようにすると速いだけでなくSDファイルが壊れにくくなるというメリットもありますよ。(遅いSDでシステムを動かすラズパイ用のテクニックです)
結構顕著に速度アップできるのでおすすめですよ。
しかし、広角だとアノテーションで星座線まで出るんですね。(知らなかった。。。)
こういった使い方も楽しそう。(高感度カメラのシステム改造してみようかな)
高感度カメラシステムは実用ですよね。さらなるアップデートが楽しみです!